
Tackling Technicals: The Exposure Triangle
Let’s talk technicals!
Confession: my least favorite part of photography has always been the technicals. Honestly, nothing will put me to sleep faster than reading about theory and settings.
But the truth is, part of being an artist is intimately knowing your craft. And knowing your craft includes understanding the technical aspects of what you do. This is especially true when working with strobes and flash.
How do I get perfect exposure every time?
As a photographer, you need to be able to see light, manipulate it and most importantly, expose for it correctly. Good imagery requires an interesting composition and a compelling subject, but proper exposure is a must for an image to be technically acceptable.
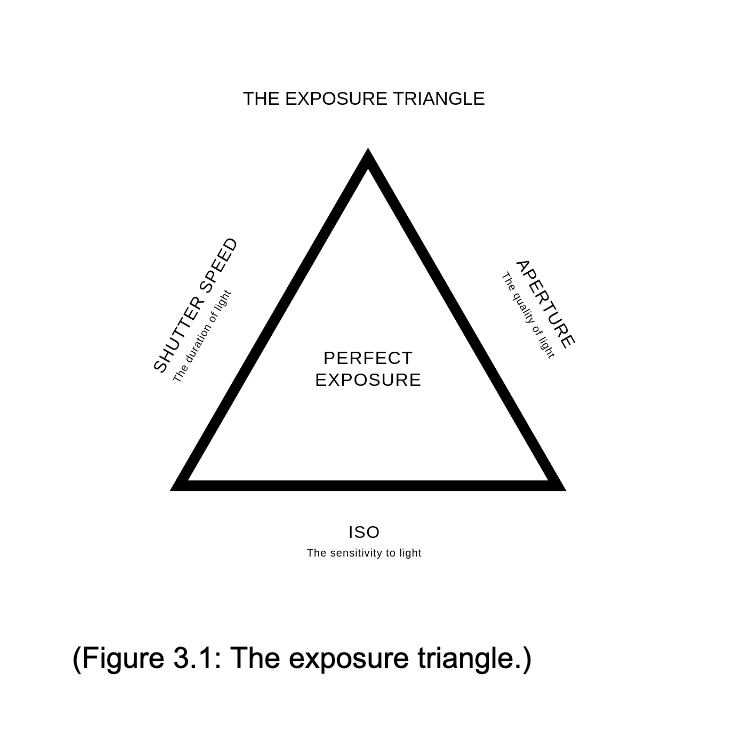
There are three settings in your camera that need to be in balance to create perfect exposure: ISO, aperture, and shutter speed. Together, they create what is known as the exposure triangle.
What is ISO?
ISO tells us how sensitive to light our sensor or film stock is.
Low ISO numbers, like 100 or 200 are less sensitive to light and are generally on bright days or in situations where light is plentiful. Higher numbers like 400, 800, 1600, and 3200 are more sensitive to light and are generally used in low-light situations, like when shooting indoors or in the evening. The higher the number, the more sensitive to light your sensor or film stock is.

Low ISO numbers indicate a sensor or film stock that is less sensitive to light. Higher ISO numbers indicate a sensor of film stock that is more sensitive to light.
How should I set my ISO number?
With film, the ISO is set by the manufacturer and printed on the box of the film you are working with. Kodak Portra 400, for example, has an ISO rating of 400.
While these ratings are not set in stone, they are a good guideline. I personally always shoot my film at the speed printed on the box and control my exposure with metering.
How does ISO work with digital cameras?
With digital cameras, you, the photographer, have a lot more flexibility in setting your ISO number. When working with strobes and flash, I like to keep mine low, as lower ISO numbers result in less digital noise. I always shoot at ISO 100 when working with my digital camera in the studio.
What is aperture?
Aperture controls the opening in your lens, helping to determine the amount of light that comes into your camera. In photography, light is measured by something called “stops”. Full stops for aperture are f1, f1.4, f2, f2.8, f4, f5.6, f8, f11, f16 and so on. Each successive stop lets in half as much light.
Modern digital cameras and lighting equipment often measure aperture by ½ stop increments or even ⅓ stop increments. So don’t be alarmed if your camera goes from f2.8 to f3.2 and f3.5 before getting to f4. Digital sensors are very sensitive to light, so having the capability to control your exposures by ½ or ⅓ stop increments can come in handy.
With aperture, low numbers let in more light, and high numbers let in less light.
It’s important to know that when the opening in your lens is wide, it’s letting in a lot of light, and your aperture numbers will be low, like f2 and f2.8. When the opening in your lens is narrow, it’s letting in less light, and your aperture numbers will be high, like F8 and F11.
What is shutter speed?
Shutter speed is another way to control the amount of light coming into your camera.
The shutter functions much like a door. When open, it lets light in. When closed, it does not. Your shutter speed determines how long you let that door stays open, and ultimately, how much light you let into your camera.
How is shutter speed measured?
Like aperture, shutter speed measures stops of light, but with shutter speed, these stops are measured in terms of how long your shutter stays open. Full stop increments start at, let’s say, 1 second that then go to fractions of a second: 1, ½, ¼, ⅛, 1/15, 1/30, 1/60, 1/125, 1/500, 1/1000 and so on.
The lower your shutter speed (1/60, 1/30, 1/15), the longer your shutter is open, and the more light you let in. The higher your shutter speed (1/125, 1/500, 1/1000), the shorter your shutter is open, and the less light you let in.
How do I balance these elements to create perfect exposure?
To create a perfectly exposed image, you want your ISO, aperture and shutter speed to be in balance.
Friends, I‘m going to reveal the secret to perfect exposure every time.
Metering.
That’s right, when you meter with strobes and flash, you can achieve perfect exposure every time.
Teach me how to use the exposure triangle in my work!
I’ve been teaching other photographers how to create soft, natural-looking light with strobes and flash since 2014! And I would love to teach you too! There is no need to feel intimidated by the technicals.
You can learn more about my method and about my signature course, The Missing Link, by watching my free informational webinar!
In this 60-minute course, you will learn how artificial light can help your brand and your business, some of the common mistakes people make when getting started, what equipment you need (and don’t need) when getting started AND exactly what I teach the students I work with inside of The Missing Link.